Monday, November 12, 2012

Another Type of Perspective

When taking touristy photos of famous places, buildings and structures, I have always sought to isolate that famous place. You know, wait for the moment when there are no tourists in the scene. On a recent trip to Paris, I found that impossible. It was so crowded that in most cases, I would still be waiting for that exact moment. I did make an important discovery though.

We were at Versailles and at the back of the property is the Petit Trianon, a home given to Marie Antoinette by her husband King Louis XVI. Much less crowded, I had a chance to take this image. I loved the scene with the tile floor leading into the frame and the door opened at the far end. I loved the light shining through and the repetition of the pillars.


Here is the same image with a person just entering the scene. There was a time when I would have discarded this image because I didn't know the person, I was just trying to capture the famous place, whatever... Not so now. To me, having the person in the image increases interest in a number of ways. It adds:
  • motion
  • gives perspective to the size of the building
  • human interest
 

Here is another example from a shop window in Paris. I loved the colors of the shop (They sell the best macaroons in Paris!) but it was raining and I didn't want to stand there waiting for the people to pass, which would have been like NEVER.  So snap I did and look at this. Two girls sharing an umbrella peering into the shop. The other pedestrians are blurred because they were walking fast and I used a lower shutter speed. I love this image. 

So my lesson here is to capture people in the images, even if you don't know them. The result is a stronger human interest story.

Saturday, November 10, 2012

Changing Perspective: Down Low Squared

Possibly hum-drum to some but I love these. I am jazzed by the short depth of  field, which I can control, the sharp focus in the middle, the absolute color blast in the background and the fact that the dark spoiled edges of some are not so noticeable.

I set my camera on the ground, after fiddling with the settings and just shot away. I varied the distance from the subject and the focal length on the lens. They are not perfect but yes I am intrigued and will try some more with a new subject. Fun!


Sunday, November 4, 2012

A Change of Perspective

Do you always shoot from the same perspective. Would that be eye high? Try getting down low. Yeah lay down on the ground or set your camera down and press the shutter or better get a cordless shutter release and give this new perspective a go. You might just be surprised at the results.


Friday, October 19, 2012

Photoshop Workflows: Photo Filter

Sometimes you might forget to set the white balance on your camera according to the actual shooting conditions. You get really yellow or blue colorings in the image. Sometimes it's just that time of day. They call it golden light. It's right after sun rise and right before sun set. It can be beautiful and warm and all glowing.


This is Nick and Lynn in Europe. Too cute. I wasn't there so don't know the time of day but I am guessing it was in the golden light time frame since it is outdoors. Their skin tone has a yellow cast, which isn't too bad. There is a filter if you prefer it to be more skin colored. In Photoshop, Image>Adjustment>Photo Filter gives you a drop down menu. The first are golden colors which are useful when you have an image with a blue cast. But scroll down to the cooling filters and try one of the three. Just use your sense of correct to choose and manipulate the intensity of the filter with the slider. 


Here is my adjusted image. Still cute!!! Which do you prefer?

Tuesday, October 16, 2012

Photoshop Workflows: Levels

Photoshop is my first choice for post processing. It is so feature rich that after 10 years I am admittedly still learning this software. I started with PS Elements and it can amazingly do a lot. I migrated to Creative Suites at version 3 and now use 5.5. 

This post is about Levels adjustments, which is always my first step. 

I always begin with a levels check, no matter how the photo looks. Levels is in the Image pull down menu, Image>Adjustments>Levels. The short cut is Control L in windows and Command L on a Mac. It pulls up a histogram that basically indicates the Exposure adequacy.

Here is an example of an image:


and it's Levels histogram


A perfect histogram would be a bell shaped curve with the most data (black) in the center. As you can see, this image has too much dark and not enough light hitting the surface. Moving the white slider, which is right above the number 255, to the left just to the point where the data is beginning to appear (black blob), will vastly improve the image. It has the effect of making everything lighter, both darks and lights. In this case I nudged the black slider as well and usually find that I need to nudge both.  Depending on how the photo looks after these adjustments, I sometimes need to move the middle one as well. The middle slider adjusts mid tones. If you make a photo too light, it often takes on a smoky look. This midtone slider will improve that.

Here is the histogram moves I made and the resulting image.  You can see the lights are brighter and the edges of the leaves become crisper, more defined against the dark background. If I had moved the white slider even more, I would have picked up some of the detail in the background but don't want that. It subtle and very natural looking but markedly improved IMO.


Thursday, October 11, 2012

Still Some More Stories...

It's good and nice to capture how people live. 


an outdoor garden... 


the old horse barn... 


peaking in the porch window... 
I need to get going on my own place.

Tuesday, October 9, 2012

Telling Stories

My MIL and FIL have a wonderful old home. There are many things that create memories here. My niece, Kerry, who is a photography student at Illinois State, has documented some of these things. It made me take a hike around the place and capture some of my favorites and even notice a few that I had not seen before. I will put this one in my memory bank of things to do when trying to tell a story. Capture the home and things that are important to a person. It says so much.

The front door...doesn't it look like a face? 


The key to the grandfather clock... 


The keys of the grand... 


Birds on a planter...

Thursday, October 4, 2012

Have Camera, Will Travel

I always have a point and shoot in my purse. My I-Phone is there as well. I also make it a habit to stop when I see something interesting. Or, to pass the time. :(  One day, I was driving through the tunnel at 2 in the afternoon. Rush hour like traffic, backed up all the way to the tunnel entrance. What a bummer! Rather than a primal scream [ :o  ],  I took this photo. It sure beats road rage.


Another favorite is pics from the airplane. You would never see this from down under.


Looks like the tub is emptying. Am I so easily amused. Still smiling.

Tuesday, October 2, 2012

Caite and Robin Post Processed - LOL!

I took this image of Caite with her cousin's little girl. The image is so-so. The lighting is not great. The background is too busy and too sharply focused. The framing is not top drawer either. How do you salvage the memory and make it into something more interesting. In the film days it would be set aside. Not so in the digital world of Photoshop.


This is a more artistic rendering of the girls. Extracting them from the distracting background, converting to B&W and reducing the saturation produces this image of the girls. Playing around on the layer beneath by adding brush strokes of small dots and them clipping a gradated color to the brush strokes produces the oh so gentle color I have achieved. 


I like the end result a lot more than the original. And your take please...

Friday, September 28, 2012

Waiting Around

I am working on portraiture slowly. It is not a long suit. What I have discovered is this. Ask people to pose and them take a few shots but make them wait awhile and they begin to interact with each other. That's when the fun begins. Here is an example. I really wanted to get a photo of Rick with his mom and dad. They all smile for the camera but...


Wait a bit and they smile for each other. What fun! Love this one best!!!

Tuesday, September 25, 2012

Post Processing

There are several step I take when I get an image into my PC. Using Photoshop, the first is always a levels adjustment. Control + L gets you there. You will see a histogram of data. When photos are too  dark or too light, moving the sliders inward on each end to where the data (black in the histogram) begins will adjust the lightness or darkness of the image. The center slider is for all the midtones and I usually tweak it ever so slightly either left or right to see the outcome. One or the other generally appeals to me.

Here is a SOTC image of my nephew. It was taken under a pavilion and so he is in shadows. The backdrop is much lighter especially with the white car. The subject is under exposed. I also don't like that the telephone pole is coming out of his shoulder and the wire from his forehead.


The adjustments I made were:
  • a levels adjustment to lighten the subject
  • the self healing brush to remove both the pole and the wire
  • I then used the magic extraction brush, which is one of the selection tools, to separate  Paul from the background. This is fairly easy to do since their is so much contrast.  I set the feather factor (in the extraction box options) to 3 in order to soften the edge of subject and background.
  • After extracting him and while he was still selected, I put him on his own layer. Layer-New-Copy. This places just the subject on a layer above the entire photo.
  • To further camouflage the healing brush actions and the white car, I gently blurred the original photo which is only serving as the background . Filter-Blur-Gaussian=6.0


Here is the final result. The changes are subtle but significantly improved. The order in which things are done is important. I could have first extracted Paul and then only lightened him.It is a choice to be made. In all. these adjustments took only a few minutes. Photoshop skills are worth having.

Thursday, September 20, 2012

Exploring Space in Photographic Images

In this months Exploring with a Camera Series, Kat Sloma has selected Exploring Space. She defines this as  "a single, continuous visual element in a photograph that fills more than half of the frame but is not the subject."

In this example, my brother and I are standing on the beach in Hilton Head. We are the subject, the beach is the space.


In this example, my niece is placed in the frame with foreground and side space. It is probably not as strong an example because of the busyness of the background but the viewer can certainly breathe.


In this image, the sky provides some of the space. The foreground is busier but by applying the rule of thirds and positioning the focal point on the edge, visual space is provided.


This image is similar in structure to the last. The red tea pot placed on the right side, allows breathing room for the viewer eye.


This image is a clear winner in the Visual Apace category but again the Rule of Thirds has a huge impact on the space.


I had to search through a lot of images to find these examples and found it interesting that all of these are horizontal orientation and none are portrait. More of my images tend toward portrait however. It was also interesting for me to note that most of my photos are more closely cropped either during their taking or in post processing. Perhaps because I like the detail of the subject. I plan to pay attention to these observations as I go out and shoot additional images.I need to turn my camera to horizontal and step back allowing more space into the image. They certainly provide a sense of calm.

Tuesday, September 18, 2012

Olloclip

I am forever intrigued by new things and like to give them a go. Someone on the internet was talking about an Olloclip, which actually is a lens that clips onto your IPhone. 

The lens does three things. One end is a fish eye lens; the other side is either a macro or wide angle, depending on how you rotate it. The quality is actually fairly good, considering. Here are some examples:


This is an image of my back yard from the deck. You would need to crop this to eliminate the corners. Isn't that distorted look kind of fun! Sort of like carnival mirrors.

My favorite is the macro. Here are some examples of that one.

a tiny herb

a close up of a kitchen towel

The last type is the wide angle, probably my least favorite. Here is an example. It's a bad photo with long shadows but you can see the width of detail the lens is able to capture.


I would say the only drawback to this gadget is that you need to remove your camera case for it to clip on. Of course that would be so, since you would want a tight fit and camera cases come in every size. But how nice to have a few options with your phone and this 
1 inch by 2 inch lens. 

What fun things have you discovered?

Saturday, September 15, 2012

Hipstamatic

I have been having fun with my I-phone and some of the creative camera apps available. These images were taken using Hipstamatic, which replicates different lenses and film types. The app gives you a choice of four lenses, three flashes and 4 film types. These were taken with the John S lens, Ina's 1969 film and no flash settings. I love the greenish cast the images take on. It does resemble the poloroids that were showing up back in the 60's. 


I am sure there are folks out there who think this stuff is horrible but it's way too much fun not to try. It is totally addictive. Come on, give your phone a try.

Thursday, September 13, 2012

A Question of Balance

Thinking like an engineer, mixing salad dressing, adding the ingredients one at a time with the same measuring spoon. No mess here! 


Tuesday, September 11, 2012

Airport Art

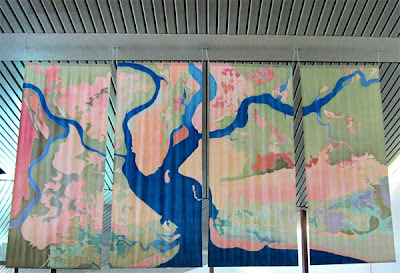
Killing time in the Charleston airport was joyful. There was a lot of wonderful art to look at throughout. Most have a river theme. At least that's how I saw it. Beautiful colorings and drapings and delight.I have tried to discover who the artist is but have not been able to. What a shame. If anyone in blogger land know, please let me know so that I can give credit here.


I love these draped panels the most. So graceful and elegant. The view changes as you walk around them. How sweet are they!


Saturday, September 8, 2012

It's Five O'Clock Somewhere

Doesn't this just say it all!!!


Happy, Happy Hour!

Thursday, August 16, 2012

Sea Oats

I have been fascinated with sea oats since the first time I laid eyes on them. Slender little branches that blow in the wind but create a community of roots that laugh in the face of the wind and the sea as if to say "We ain't going anywhere, my friends."


And in this particular place, they have opened a path to the sea. How inviting!

Tuesday, August 14, 2012

One evening while at Hilton Head, a the setting of a full moon at water's edge was there for all to see. Rick and sat on the beach and watched it rise along with a lot of other interested people. The photos were so fun to capture.

There were reflections at the early rising...


And later reflections and silhouettes...


And moon writing, my favorite.


Photography should be fun!

Saturday, August 11, 2012

Repetition in the Garden

I love when I discover repeating elements. I discovered these at the Chicago Botanical Garden. The day was overcast so the lighting was special. Bits of shadow but no glaring shine. WOW!! Perfect for pictures!

The spheres on the posts on the right but assymetrical overall...my fav

Again, repeating spheres and a wall of trees with a brick vanishing point. Gotta love it!

  And then, the lone element with wonderful shadows and brick diagonals.

To read an article on repetition and see other images in kind, check here.